即时通讯 IM Web 快速开始
即时通讯 IM Web 快速开始
本页面介绍如何快速集成即时通讯 IM Web SDK,并基于 SDK 实现单聊文本消息的发送和接收。
实现原理
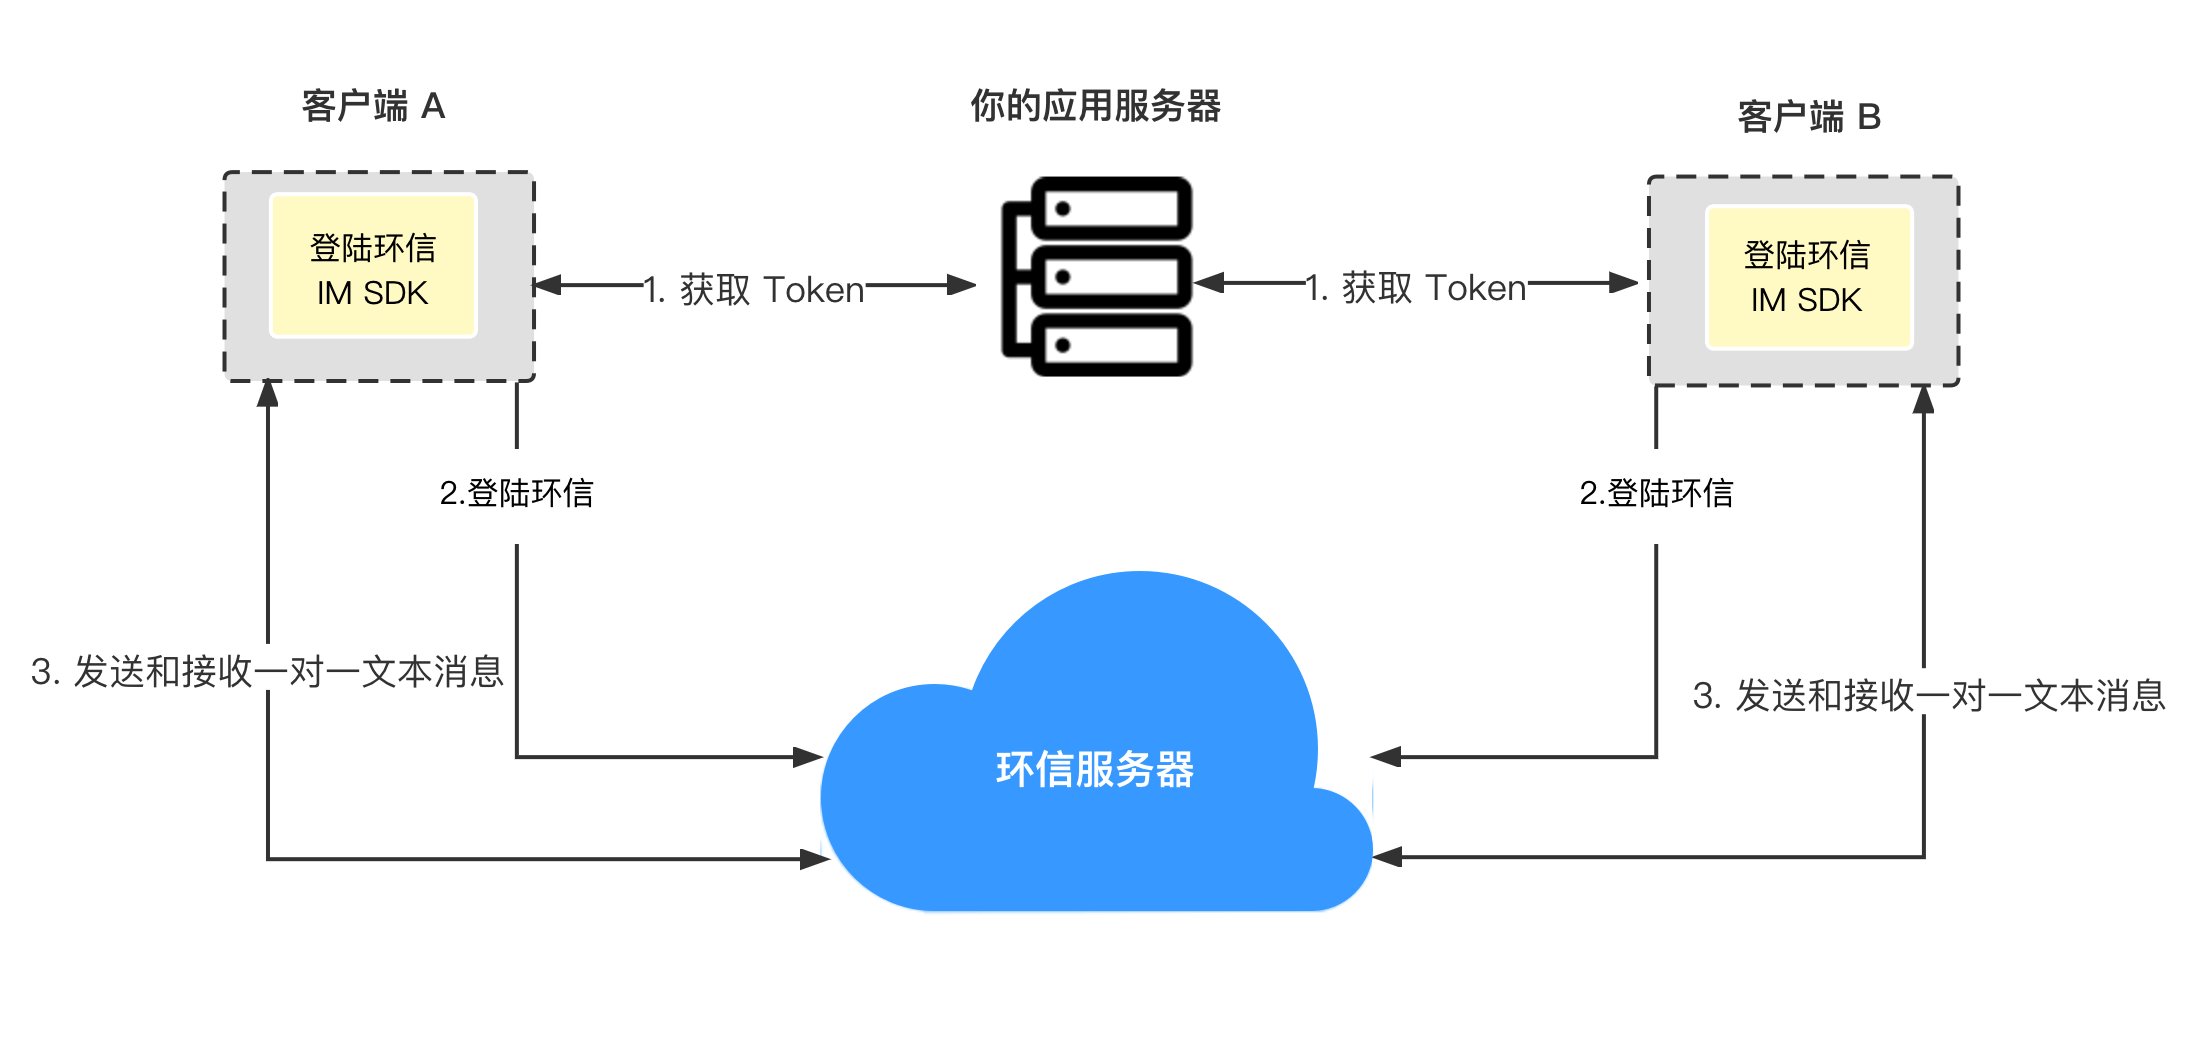
下图展示客户端发送和接收一对一文本消息的工作流程。
环境准备
新建 Easemob_quickstart 目录。在该目录下运行 npm init 命令创建 package.json 文件,然后创建以下文件:
index.html:用于设置 Web 应用的用户界面;index.js:用于实现 SDK 初始化、登录、消息发送和消息接收逻辑。
此时你的目录中包含以下文件:
Easemob_quickstart
├─ index.html
├─ index.js
└─ package.json
前提条件
- 有效的 即时通讯 IM 开发者账号;
- 在声网控制台 创建项目并开通 IM,获取项目的 App ID;
- 已安装 npm;
- SDK 支持 IE 9+、Firefox 10+、Chrome 54+ 和 Safari 6+。
实现流程
本节介绍如何将即时通讯 IM Web SDK 集成到项目中。
步骤 1:集成 SDK
- 在
package.json的dependencies字段中加入easemob-websdk及对应版本:
{
    "name": "web",
    "version": "1.0.0",
    "description": "",
    "main": "index.js",
    "scripts": {
        "test": "echo \"Error: no test specified\" && exit 1"
    },
    "dependencies": {
        "easemob-websdk": "latest"
    },
    "author": "",
    "license": "ISC"
}
步骤 2:创建用户
在 声网控制台 创建用户,获取用户 ID 和用户 Token。详见 创建用户文档。
在生产环境中,为了安全考虑,你需要在你的应用服务器集成 Token 鉴权 实现获取 Token 的业务逻辑,使你的用户从你的应用服务器获取 Token。
步骤 3:实现用户界面
index.html 的内容如下。
<script src="./dist/bundle.js"></script> 用于引用 webpack 打包后的 bundle.js 文件。webpack 的配置在后续步骤中介绍。
<!DOCTYPE html>
<html lang="en">

<head>
    <meta charset="UTF-8">
    <title>Easemob Chat Examples</title>
</head>

<body>
    <h2 class="left-align">Easemob Chat Examples</h2>
    <form id="loginForm">
        <div class="col" style="min-width: 433px; max-width: 443px">
            <div class="card" style="margin-top: 0px; margin-bottom: 0px;">
                <div class="row card-content" style="margin-bottom: 0px; margin-top: 10px;">
                    <div class="input-field">
                        <label>User ID</label>
                        <input type="text" placeholder="User ID" id="userID">
                    </div>
                    <div class="input-field">
                        <label>Token</label>
                        <input type="text" placeholder="Token" id="token">
                    </div>
                    <div class="row">
                        <div>
                            <button type="button" id="login">login</button>
                            <button type="button" id="logout">logout</button>
                        </div>
                    </div>
                    <div class="input-field">
                        <label>Peer user ID</label>
                        <input type="text" placeholder="Peer user ID" id="peerId">
                    </div>
                    <div class="input-field">
                        <label>Peer Message</label>
                        <input type="text" placeholder="Peer message" id="peerMessage">
                        <button type="button" id="send_peer_message">send</button>
                    </div>
                </div>
            </div>
        </div>
    </form>
    <hr>
    <div id="log"></div>
</body>
<script src="./dist/bundle.js"></script>
</html>
步骤 4:实现消息收发
index.js 的内容如下。本文使用 import 方法导入 SDK,并使用 webpack 对 JavaScript 文件进行打包。你需要将代码中的 <Your app ID> 替换为你的应用的 App ID。
import { ChatClient, ChatManager } from 'easemob-websdk';

const appId = '<Your App ID>';
let userId;
let token;

const appendLog = (text) => {
    document
        .getElementById('log')
        .appendChild(document.createElement('div'))
        .append(text);
};

// 初始化 SDK,并注册 ChatManager。相关参数配置详见初始化文档。
const client = ChatClient.init({
    appId,
    managers: [ChatManager],
});

// 监听连接状态。
client.addEventHandler('connection', {
    onConnected: () => {
        appendLog('Connect success!');
    },
    onDisconnected: () => {
        appendLog('Disconnected.');
    },
});

// 监听消息。SDK 中所有类型的消息统一通过 onMessage 回调接收。
client.addEventHandler('message', {
    onMessage: (message) => {
        console.log(message);
        if (message.type === 'text') {
            appendLog('Message from: ' + message.from + ' Message: ' + message.body.content);
        }
    },
});

// 按钮行为定义。
window.onload = function () {
    // 登录。
    document.getElementById('login').onclick = async function () {
        userId = document.getElementById('userID').value.toString();
        token = document.getElementById('token').value.toString();

        try {
            await client.login({
                userId,
                token,
            });
            appendLog('Login success.');
        } catch (e) {
            console.log('login failed', e);
            appendLog('Login failed.');
        }
    };

    // 登出。
    document.getElementById('logout').onclick = async function () {
        await client.logout();
    };

    // 发送一条单聊文本消息。
    document.getElementById('send_peer_message').onclick = async function () {
        const peerId = document.getElementById('peerId').value.toString();
        const peerMessage = document.getElementById('peerMessage').value.toString();

        const message = client.chatManager.createTextMessage({
            conversationId: peerId,          // 单聊时为对端用户 ID。
            conversationType: 'singleChat', // 会话类型,设置为单聊。
            content: peerMessage,           // 文本消息内容。
        });

        try {
            await client.chatManager.sendMessage(message);
            appendLog('Message send to: ' + peerId + ' Message: ' + peerMessage);
        } catch (e) {
            console.log('send private text failed', e);
            appendLog('Message send failed.');
        }
    };
};
提示
对于 TypeScript,可以按需从 easemob-websdk 引入类型声明,例如:
import { ChatClient, ChatManager, type Message } from 'easemob-websdk';
步骤 5:运行项目
本文使用 webpack 对项目进行打包,并使用 webpack-dev-server 运行项目。
- 在
package.json的dependencies字段中添加webpack、webpack-cli和webpack-dev-server,并在scripts字段中添加build和start:dev命令。
{
    "name": "web",
    "version": "1.0.0",
    "description": "",
    "main": "index.js",
    "scripts": {
        "build": "webpack --config webpack.config.js",
        "start:dev": "webpack serve --config webpack.config.js"
    },
    "dependencies": {
        "easemob-websdk": "latest",
        "webpack": "^5.50.0",
        "webpack-dev-server": "^5.0.0",
        "webpack-cli": "^5.0.0"
    },
    "author": "",
    "license": "ISC"
}
- 在项目根目录中添加
webpack.config.js文件,用于配置 webpack。文件内容如下:
const path = require('path');

module.exports = {
    entry: './index.js',
    mode: 'production',
    output: {
        filename: 'bundle.js',
        path: path.resolve(__dirname, './dist'),
    },
    devServer: {
        compress: true,
        port: 9000,
        open: true,
    },
};
此时你的目录中包含以下文件:
Easemob_quickstart
├─ index.html
├─ index.js
├─ package.json
└─ webpack.config.js
- 在项目根目录运行以下命令,安装依赖项。
$ npm install
- 运行以下命令使用 webpack 构建并运行项目。
# 使用 webpack 打包。
$ npm run build

# 使用 webpack-dev-server 运行项目。
$ npm run start:dev
项目启动后,在页面输入当前用户的用户 ID 和 Token 进行登录。登录成功后,输入对端用户 ID 和要发送的消息,点击 send 按钮发送消息。你也可以在另一个页面中使用另一个用户登录,测试单聊消息的互相收发。